|
Dreamweaver CS5, SubVersion and Windows - the final step
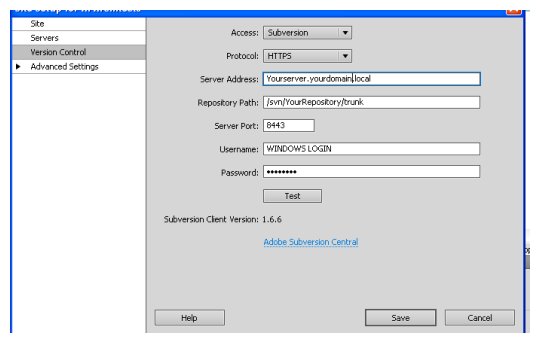
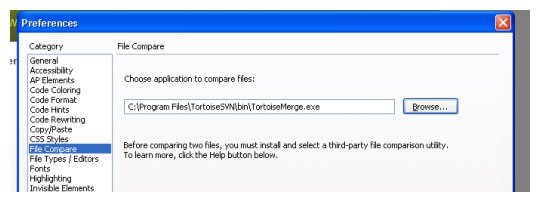
[Note: we also have a complete guide to SeaMonkey/SubVersion integration which can be applied to most HTML editors without integrated SVN support.] With the client and server all set up for Subversion, all that remained was to set up Dreamweaver to work with the new repository. This needed to be done separately for each user. Here's what we needed to do: 1) Before starting, ensure that the site is fully up to date and all content has been checked in (not an issue for initial setup but it could be when adding a new user later on). 2) Log into the client machine with the user's Windows login and check that Tortoise is set to use the last commit date as the file date, as described in the client setup page. 3) Create a new directory which will contain the user's local mirror of the site and give it a sensible name without any spaces - such as Username_sitename_localsite. 4) Open Dreamweaver and choose "New Site" from the Site dropdown menu. 5) In the Site tab, enter the site name and the path to the newly created local directory. 6) In the Servers tab, click the plus sign to add a new server and enter the details for the live server (this does not have to be done immediately). The Version Control tab needs to be filled in as per this screenshot, assuming that the default directory structure was used for the repository as discussed on the server setup page Clicking Test should bring up a message box saying "Server and project are accessible!" The Advanced Settings tab can be left alone, but it can be useful to tick the box to enable cloaking. 7) Save the site settings (they can be edited at a later date by choosing Manage Sites from the Site menu). 8) Now go to the site pane in the bottom right hand corner and right-click on the root directory of the new site. Choose Version Control-Get Latest Versions. This populates the user's local mirror with the latest version of the site from the repository. 9) Finally, right-click on any file from the local site and select Version Control-Compare with Remote Server. You will be asked to specify a program to open the revision history. Select from a list and browse to find TortoiseMerge. Setup is now complete!
blog comments powered by Disqus |
| Related pages |
| Rejoining client PCs to the domain of your new virtual server Step-by-Step Guide to virtualising a physical machine What is Virtualisation and how it can help a Small Business? |