This step by step guide assumes you already have a Dreamweaver / Subversion / Windows environment as described in our earlier setup guide. Here, we explain the steps involved in getting the various files, folders and remote access links set up to put a new site into that environment. In this guide we're not presuming to offer you all the answers for crafting world-beating HTML
First, you will need to identify the Web Host or Internet Service Provider and collect from them usernames and passwords. Normally, access to the live server will be via FTP and the server's FTP address (host name or IP) will also be necessary.
Then, start Dreamweaver on the client machine (the one you will normally be working on), and choose the menu option Sites > New Site.
Client Machine
Dreamweaver
Site --> New Site
Here you first choose a name for the site - just for internal use - and a directory to keep the files in. This should really be in your own area under My Documents.
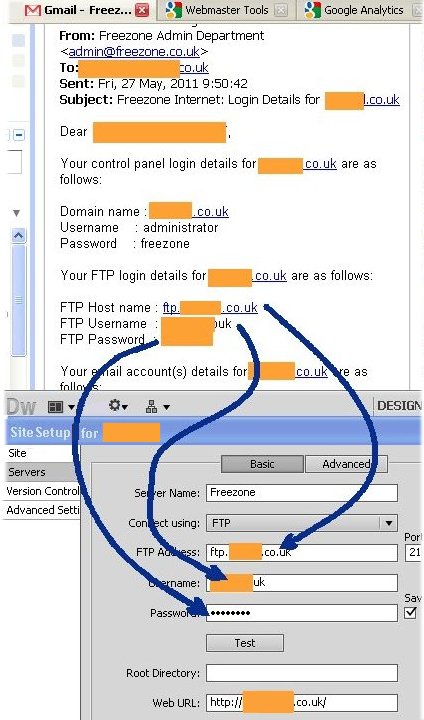
Next, you need to add a server. This is the server where the domain will be hosted. The screenshot here shows how the information supplied by the Domain Host - in this case my friends at Freezone - is lifted from their Email and fed into Dreamweaver. You can add more servers later - for testing or extra live ones - but for smaller sites this won't normally be necessary.
If you are modifying an existing site that was created in a different environment you now need to fetch all the files from the server onto your local machine. To the bottom right of the Dreamweaver screen, there is a file manager pane. Here, right-click on the site to fetch up the context menu, then select Get and apply this to the whole site. It could take a little time.
Server
Visual SVN Server
Right-click Repositories and choose to create a new repository. Note the name - probably on a piece of paper (so much for the paperless office!)
Client
Right-click the local copy of the directory.
Tortoise SVN
Use import to transfer the local copies of the files into the SVN repository.
Client
Explorer
[This counter-intuitive step is needed to synchronise the 2 "remote" versions of the files: those on the live server and those
in the the SVN repository.] Backup, then delete the local copies of everything below the top new directory that you have
just created.
Client
Dreamweaver
Site Manager
Link the site to SVN
Select the site folder.
Version Control > Get latest versions
Google Analytics
Analytics Settings
Add Website Profile
Add your URL (Keep the trailing backslash!) and click Finish, then take the code snippet and copy it
Client
Dreamweaver
Open index.html - or create one if there isn't one
Paste the code snippet into this page and any other pages you want monitored and then check in & publish.
Google Analytics
Edit -> Check status
...to confirm that Google can see your code snippet.


 e shows how the information supplied by the Domain Host - in this case my friends at Freezone - is lifted from their Email and fed into Dreamweaver. You can add more servers later - for testing or extra live ones - but for smaller sites this won't normally be necessary.